Monday, November 24, 2008

Friday, September 12, 2008

We Don't Like Ike

Looks like Ike is poised to bowl a strike right into the Houston area -- right into my house. Let's hope damage is minimal.

***posted from relative safety ~200 miles away in San Marcos, TX***

Monday, September 1, 2008

I'm floored

Finished cutting and tacking in the floor panels today, and was able to flip the chassis over to begin stitch welding the floor pans and Aussie reinforcement plates in place. You might also notice that I left the nose gussset wide at the front such that the front lower transverse framerail (where the bottom front suspension pickup is) is gusseted with the same piece. Not sure if this will do anything, but it won't hurt anything.


Also cut and tacked the footbox ends in place.


Welding really takes it out of you when you're wearing long pants and sleeves and working in a hot garage. I still need to weld most of the floors. Fortunately, that work is quiet enough to do during the weeknights so hopefully I'll be working on seats, pedals, and/or steering next weekend.


Sunday, August 31, 2008

Get on the Floor and Do the New Kids' Dance

Earlier this week I got my steel sheet shipment, consisting of 16 ga. and 18 ga. mild steel sheet, from metaldepot.com .

Saturday was mostly taken up by an emergency at work, so no Se7en progress was made.

So far today (and I ain't done yet), I've made great progress, however! Most of the floor is cut and tacked into place, as well as two of the Aussie stiffening mods. 16 ga. sheet was used for the "nose gusset" as well as the two "engine torque gussets." The footbox floors also received 16 ga. sheet. The rear section of the floors (where the seats will be) are 18 ga. in order to save weight.


I also made an attempt to make my own seats out of fiberglass... I've not abandoned it yet, but they're not exactly turning out great so far.


Stay tuned for further work...

Sunday, August 17, 2008

'Roo Bars

Unlike the good ole' U.S. of A, Australia actually cares whether or not you've done a good job engineering that contraption that just rolled out of your garage. To that end, there are special rigidity tests that a custom chassis (like our Se7en) must pass in order to get the official stamp of approval. This has forced our resourceful bretheren from the island continent to improve upon the standard Locost chassis -- and they've been nice enough to share their wisdom. There are many resources detailing these enhancements, and this website is one of them:


Today, I spent some time improving upon my chassis. Specifically, I paid attention to the area to which the front suspension attaches. Aside from the gaping hole of the engine bay, I feel that this is the area most in need of some additional rigidity. First, I added a triangulating tube to the trapezoidal "nose" of the chassis.

3/4" round tubing was used to match some of the other chassis tubes (and because it looks nicer). First each corner was cut and shaped to fit the wonky angles (chopsaw and sanding disk are most helpful), then held in place with magnets and tack welded. Finally, it was fully welded. Special care was taken so that the inlet/outlet pipes of the radiator (in this case, from a Suzuki Swift GTi) were not blocked by this new tube.


Next came the tubes that triangulate the suspension pickup points. Although the orientation does not seem to flow with the other round triangulating tube on the side of the chassis, the positioning is deliberate -- I wanted to leave plenty of room for the tie-rod ends of the steering rack. Thinking ahead is a necessity when building a Se7en.

The other side was then finished.
Future plans: welded-in 18 ga. steel floors, welded-in 20 ga. steel transmission tunnel, welded-in 20 ga. steel rear firewall, welded in 16 ga./18 ga. steel footbox paneling.
Potential additional bracing: engine bay diagonal, removable transmission tunnel lower brace, maybe more?? (I don't want to get too wild with bracing, so I may not do any of these things. These two items are easily added after the car is on the road, so I will probably wait for the first winter to perform these upgrades.)

Saturday, August 16, 2008

Touch-up welding

Stripped the chassis down this afternoon (not that there was much to remove) so that I could finish welding the diff mounts and transmission bracket mounts.


Diff mount (as seen from the bottom up):


Trans mounts (as seen from the bottom up):

Friday, August 15, 2008

Back in the saddle

Wow, mid-August already. I'm well overdue for an update, so here goes.


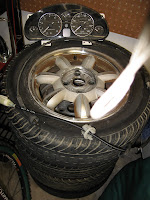
First of all, a huge thanks to my generous neighbor, Jason, who donated a set of Miata wheels, gauge cluster, and speedo cable to the build!


By the way, if you're looking for a ready-built Se7en, Jason is selling his motorcycle-engined autocrosser for CHEAP:

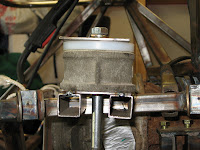
http://www.usa7s.com/aspnetforum/Default.aspx?g=posts&t=2613

Last weekend, I finished the transmission bracket, which is basically an "L" with a gusset in the "elbow." It's attached to the chassis via two bolts, one on each end of the bottom of the L.


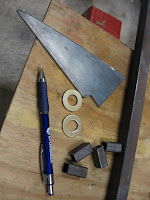
It is isolated via rubber bushings. Here is a pic of the bushing assemble before I had the bolt carriers welded to the L and chassis.


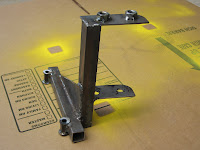
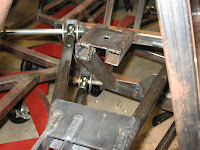
Today, I moved on to the mounting brackets for the "ears" of the differential. The differential was already positively located with the lower torque bracket (done by previous owner) and shimmed to the correct height at the "ears."

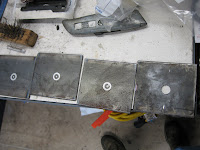
First, I cut four plates, two upper and two lower:


Then, I cut two horizontal supports per side:


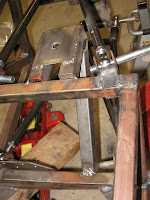
And welded it all up:


I then added triangulation down to the lower chassis rail:


Next, I'll be painting a few things to keep the rust off, then moving on!

Tuesday, July 1, 2008

Mounting a Tranny (cont'd)

Further progress was made Sunday. Now all that's missing is the 1x1 crossbeam that will be welded to the chassis, and the drilling of the bolt holes. Oh, and the mounting bracket will get a gusset in the "elbow" of the L to reduce stress on the weld. Unfortunately this part of the bracket has to clear the speedometer cable so I can't make the gusset as beefy as I would like. The transmission will be isolated from the chassis by 1/2" rubber bushings made from a hardware store rubber stopper (not pictured).


Saturday, June 28, 2008

Bracketeering

After a short while off, the Seven is getting attention again. On Father's Day I finished the engine mounts, and this morning I lowered the engine/transmission into place. It fit nicely, exactly where I intended. That feels pretty good :) Next, I began work on the transmission torque mount. I cut out a cardboard template that I will use to make the upper and lower mounting "ears" of the bracket. Again, the metal is 1/8" steel plate. Holes are 1/2".
Next will come a piece of angle iron welded to the rear edges of the upper and lower ears, and the angle iron will be bolted to the chassis. If this is not totally clear, just wait -- you'll see soon enough!

Sunday, June 15, 2008

From the depths of the C...

So, you're guessing that the project is gone, sold, forgotten, or abandoned. WRONG! I've been busy with some other stuff, including work on my new $1600 daily driver:


We needed to cut expenses, and the WRX (*not* the Se7en) was the logical place to cut (see, I think you'll agree that my priorities are in the right place).
We've been busy with visitors, and I've been doing some maintenance work on the 318i. It still needs struts and control arms to be installed, which I will do next weekend since I have 3 days off. But I did do some work on the Se7en this weekend. The engine mounts are finished, and I can move onto the transmission mounts! I did some cutting and welding (and re-welding) on the mounts, so that they will now allow the engine to be lifted free of the car when the bolts are undone! Good idea, I think. I'm also pleased that I finally figured out the proper setting on the MIG so that I get good penetration on my welds. The welds on the mounts are BEEFY.

Saturday, May 10, 2008

It's In, I Swear!

Here are some random pics of the engine and transmission in its final position. I still need to make the transmission support bracket.


The normal 1.5 - 2 inches of sump hangdown that you get with a Miata engine:


Plenty of room for a nice steering column setup. The gentleman who built this chassis offset the transmission tunnel to the right a tad, to enlarge the driver's area. Good idea for a number of reasons (though it did make positioning the engine/trans take a little more brainpower than it otherwise would have).

...and We're Back.

Sorry for the delay in posts, dear readers (assuming that any of you readers out there actually anticipate the next entry). No, I haven't stopped work on the Se7en! I've just been a bit busy with work and haven't posted any blog updates.

So... developments since the last post:

1. My friendly neighbor and fellow GRMer (http://www.grassrootsmotorsports.com/) Jason is stripping down a Miata to make a track car, and in the process he's removing all of the "soft bits" as well as putting some proper wheels and tires on it. Ergo, he's graciously offered to give me, free of charge, his "daisy" Miata wheels w/ roll-around tires, the gauge cluster, and the speedo cable. [Jason is also selling his racecar Se7en (bike-engined no less), so there will not be the unlikely coincidence of two Se7ens in the same neighborhood.] His generosity will afford me more money in the budget for other things, though I am not quite sure where it will be used.

2. I got a new throttle body to replace the one mashed up in the donor car's wreck:


Unfortunately, the back side looked like this:


After some scrubbing with carb cleaner, it was much better:


3. Engine mounts are progressing nicely! Holes were drilled, the engine/transmission were positioned, and the mounts were tacked into place:


Unfortunately, the one slot I put on the passenger's side mount was not large enough, so I'll need to elongate it.